123FormBuilder Knowledge Base
Search our documentation platform for answers, service specifications and 3rd-party integrations.
[AppExchange – 123FormBuilder] Prefill dropdown with picklist values
Let’s assume you want to bring all the available values from a specific Salesforce picklist, without having to manually add those values in the 123FormBuilder field and the pre-selected value on the form needs to be the one selected in Salesforce on that specific record.
This setup is useful especially if the values in the Salesforce picklist will change often or if you have a large list of values and find it difficult to manually add them as choices on the form.
In order to walk you through the setup, let’s consider this scenario:
I want to prefill on the form the Lead Source dropdown, but also list all the other available choices from the Salesforce picklist, in case the person filling out the form needs to change the selected option.
- SF Object → Contact
- SF Picklist → Lead Source
Let’s get started. Follow this step by step guide:
Step 1. Create Lookup in the Picklist object and prefill form dropdown with Salesforce values
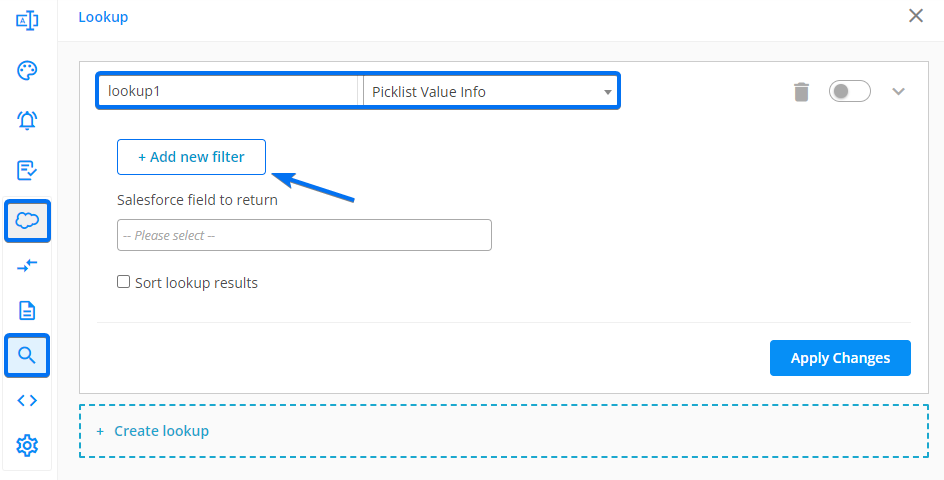
In the Form Editor section of the form builder, go to the Salesforce integration and select the Lookup tab.
Start by creating a new lookup, name it (we called it lookup1), and select the object to be Picklist Value Info.
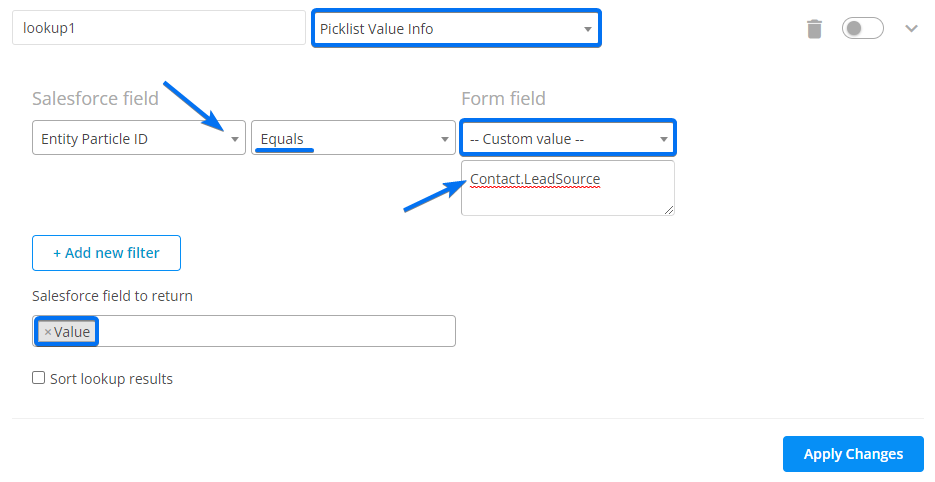
Next, click on Add new filter where: the Salesforce Field is Entity Particle ID, operation Equals and the Form field is Custom Value with the value as the ‘FieldDefinitionId’.
In Salesforce field to return select the Value field.
In case you don’t know what the FieldDefinitionId for your field in question is, you will first need to:
- Go to Workbench.Developerforce (Log In with Salesforce)
- At queries select SOQL QUERIES

- Select your Object
- Copy the following query:
SELECT EntityDefinitionId, QualifiedAPIName, FieldDefinitionId FROM EntityParticle WHERE EntityDefinition.QualifiedApiName ='Customer'
- Replace OBJECT_API_NAME with your object EX: ‘Contact’, ‘PickList__c’
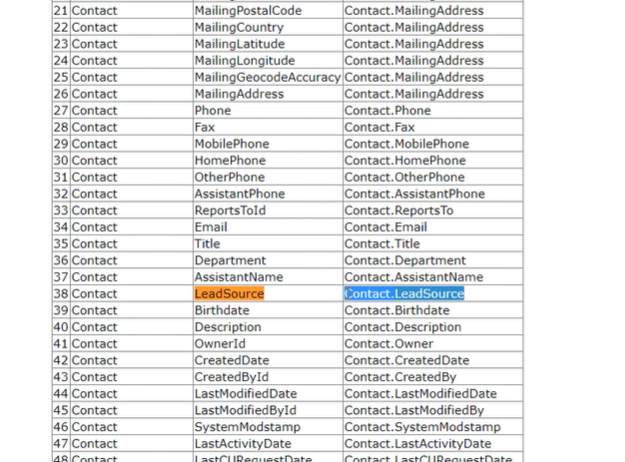
- Run the Query and get the ‘FieldDefinitionId’ from the query results. In our case, it will be Contact.LeadSource.
Now that we have returned the values from Salesforce, we need to set the Form Prefilling part.
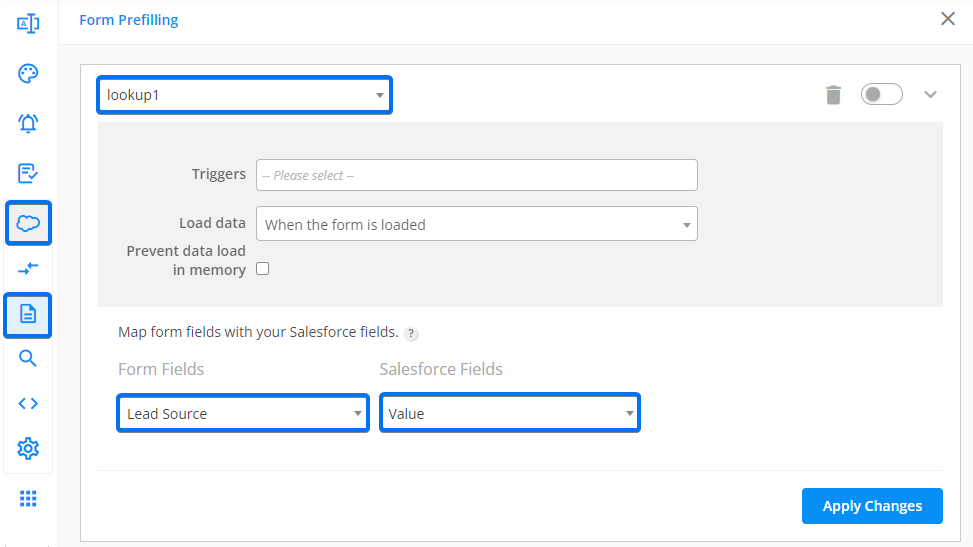
Switch to the Form Preffiling tab, click on Add prefill connector, and select the lookup that we just built.
For the Form field, select the dropdown that you want to populate (in our scenario – Lead Source), and in the Salesforce field select Value.
Stop here if you just need to bring on the form the picklist values available in Salesforce.
Continue if you also want to have the dropdown prefilled with the value selected in Salesforce.
Step 2. Create lookup to return from Salesforce the selected value for a specific record and prefill a text field
First, add a short text field on the form. You can even set it to be hidden on the form, the prefill will work regardless of the field is displayed or not on the form.
Create a new lookup and choose from which object you want the information to be prefilled.
Remember that in this scenario, I want to prefill Lead Source from Contact, so the new Lookup will be on the Contact object and I will return the Lead Source field from Salesforce:
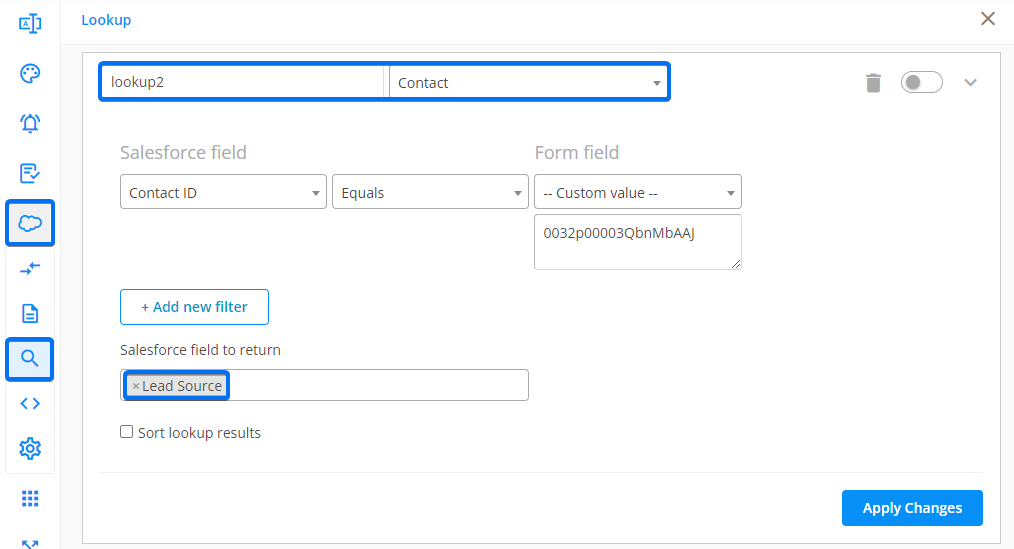
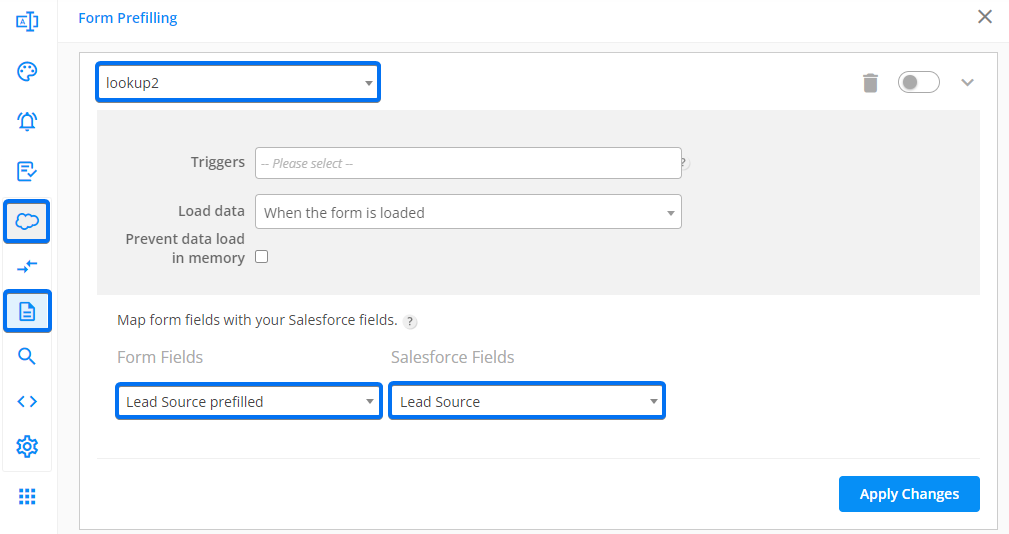
Now, let’s prefill the text field with that value.
Navigate to Form Prefilling, create a new prefill connector and select the lookup created above. At Form Fields, choose your text field, and at Salesforce Fields choose the value returned from Salesforce.
Step 3. Create, upload, and add to the form this custom JS
This is the final step needed to return from Salesforce the selected value for a specific record and prefill a text field.
Copy the following script in a text editor:
(function()
{ window.addEventListener('load', function(){
loader.engine.on('compute-form-rules-done', function() {
var value = loader.getDOMAbstractionLayer().getControlValueById('34752448'); // '34752448' id of the control where the selected value is (the hidden input)
loader.getDOMAbstractionLayer().setControlValueById('34752445', value); //'34752445' id of the picklist values (the dropdown)
});
});
})();
Replace the field IDs that are bold in the script with your own field IDs.
To find your field IDs, right-click on the field, select Inspect Element, and hover the mouse cursor over your entire field. The ID will be listed after data-id. For more information check out this guide.
After you replaced the field IDs, save the file with the .js extension and upload the JS script file on a secured hosting service.
Once you have the script URL, go to your form’s Advanced → Form tab section and paste the script under Add a JS script to your form.
That’s it!
Related articles
Similar Articles
Frequently Asked Questions
Here is a list of the most frequently asked questions. For more FAQs, please browse through the FAQs page.